Finally! I started my own blog. Whoop whoop!
It took me a very long time to actually try myself in writing. I hope it all works out in the end. 😉
In my first blog post, I would like to tell you how I created this blog/static website. Buckle up!
Let’s start right from the beginning. A little more than a year ago, (Dec 2017) I decided to buy a domain. I didn’t know what to do with it, but I was pretty sure it would be useful one day. I guess I was right. Recently, I started seriously thinking of starting a blog and searching for reliable hosting services and a very simple CMS/blogging platform.
After some research and great advice from my friends on Twitter, I decided to try GitHub Pages (https://pages.github.com/) as a hosting platform. I already had a GitHub account and it was free to host a static website there. Setting up GitHub pages is pretty straight forward, and there’s a really good guide on how to do it right on the main page. A couple of notes from me:
- The repository should be public if you want a free experience.
- I replaced the master branch with gp-pages branch, but I don’t think it’s critical.
- Double and triple check your repository settings. Make sure that it’s set up for GitHub Pages. Later, you’ll be able to setup a custom domain there.
The recommended blogging platform for GitHub pages is Jekyll(https://jekyllrb.com/). I really liked the platform and setup was really easy but being a web developer and liking design and pretty things (yes, I want my blog to be not only interesting, but also pretty), I didn’t find a theme I liked in Jekyll, so I decided to go with WordPress. WordPress offers a huge amount of free and paid themes and they’re customizable and easy to work with.
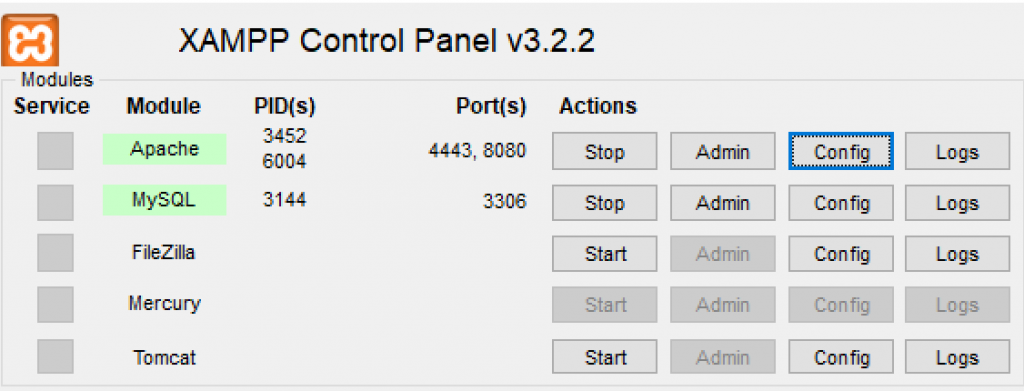
Currently, I’m mostly working with .NET. It’s been 5 years since I saw PHP, MySQL and Apache. Nevertheless, I moved straight to downloading WordPress and other tools like MySQL and Apache. When I installed everything, I wasn’t pleased with how hard it was to connect and run all the pieces. After a little bit of research, I found a tool called XAMPP (https://www.apachefriends.org/index.html). XAMPP will install everything you need automatically. The only manual step I had to take was updating the port in the Apache config – I replaced “Listen 80” with “Listen 8080” in httpd.conf. Once the installation was complete, all I had to do was start MySQL and Apache in the XAMPP control panel.
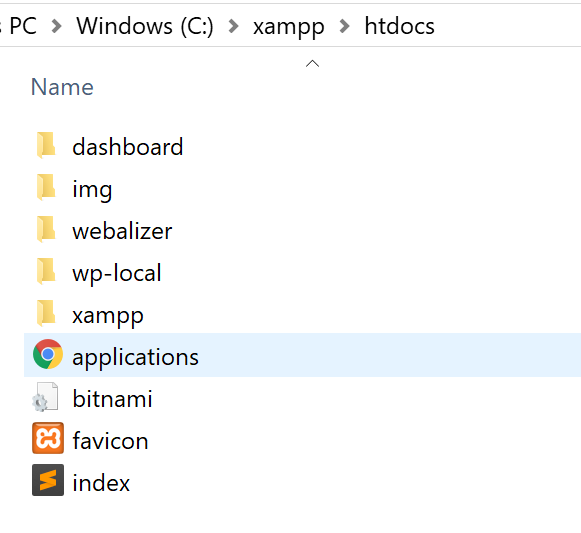
Once XAMPP was installed and MySQL and Apache were running smoothly, I copied WordPress files (the ones I got from wordpress.org) to the XAMPP directory (example: C://xampp/) under htdocs folder.
After that, I needed to setup the MySQL database. Setting up the MySQL database can be done in the admin panel which you can access right from your XAMPP control panel (see the Admin button in the MySQL row in my screenshot above).
- In the XAMPP admin page, click on “Databases”
- Type any name (you might have to update collation in the dropdown), and press “Create” button.
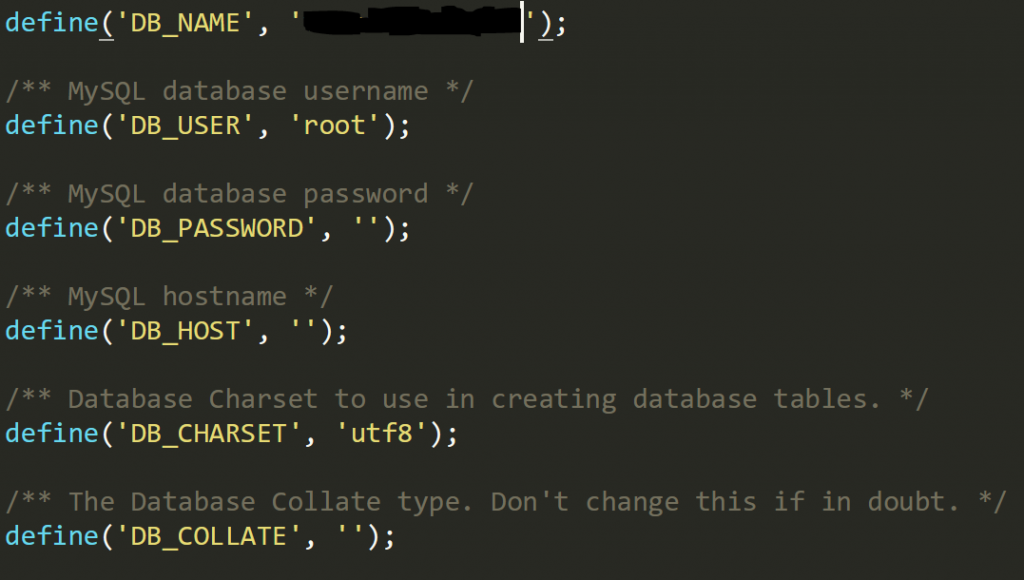
It’s important to remember the name you entered for the database. Why? Because it’ll need to be added to the website config which is located here \htdocs\wp-local\wp-config.php. - Go to \htdocs\wp-local\wp-config.php and update DB_NAME value and save the file.
That’s it here.
Run your website and go through regular WordPress setup. Add theme, blog posts, homepage and anything else you might need there.
When I was ready to actually make the site public and copy over my work to GitHub Pages repository, I needed to make the content static. There’re definitely a couple of disadvantages here such as
- no out of the box search and commenting
- everything dynamic will be eliminated
But it’s not the end of the world. You can use tools like Disqus (https://disqus.com/) for comments and Azure Search (https://azure.microsoft.com/en-us/services/search/) for search. I haven’t implemented either of these yet, but I’ll keep you posted.
How to make the content static?
There are several ways of doing this but I found a really interesting WordPress plugin called Simply Static (https://wordpress.org/plugins/simply-static/) that was really easy for me to use. It will create a static version of your website just within a minute or so.
- Add the plugin to your WordPress site
- Open Settings tab of the plugin menu
- Select “Save for offline use”
- Delivery method – “Local Directory”
- Choose a folder where the plugin will be generating static pages (it can be any folder, but I decided to generate filed right to my local repository folder, so I can easily commit and push my changes to GitHub right away)
- After that move to “Generate” tab of the plugin and generate your static pages from there
Now you can commit and push your files to GitHub and enjoy your beautiful website!
There’re actually 2 more things you should know:
- you have to re-generate the whole site every time you want to make your content update live
- you manually need to copy over CSS and JS files (let me know if you know a workaround for that).
That’s just the beginning. Like, share, email me or send DMs on Twitter and check my GitHub of course.