This year is very different and keeps bringing new ways of doing things and unique experiences. In May 2020 Microsoft had a 100% virtual Build – one of their biggest conferences for developers. I think they did a good job and were able to bring together people from all over the world. So many interesting sessions were presented, and lots of cool new tech tools were released. I hope you had a chance to watch it if not live then at least the recordings.
I was fascinated by all the work in the AI area: Responsible ML, new features and updates in Cognitive Services, Azure Cognitive Search, etc. But the things I wanted to try right away were enhanced Bot Framework, Bot Framework Composer and Virtual Assistant Template. I’ll try to tell you more about my findings in future blog posts, but now I would like to concentrate on the Virtual Assistant.
I’ve been using Bot Framework for client work and personal projects and I’m really interested in all the updates and new features of it. With the Bot Framework you can make your bot a virtual assistant skill by connecting it to Cortana channel or Direct Line for Alexa and Google Assistant. Now with the Virtual Assistant Template, you need to make even fewer steps to connect to the virtual assistant channels.
Let’s understand what the Virtual Assistant Template is and how it makes our lives easier. It was in Beta Release state for quite some time, but it became generally available (Release 1.0) during Build 2020. According to the documentation: “[Virtual Assistant Template] incorporates the previous Enterprise Template and brings together all of the best practices and supporting components identified through building conversational experiences and greatly simplifies the creation of a new bot project including: basic conversational intents, Dispatch integration, QnA Maker, Application Insights and an automated deployment.” Sounds great, but we need to understand what that means.
To start using the template, you need to have Visual Studio for PC or Mac and download and install “Virtual Assistant and Skill Templates” from the Marketplace. That’s not the only thing you need to install before creating a new project. Make sure you have .NET Core, Node Package Manager, PowerShell Core version >= 6 (initially I confused it with regular built-in Windows PowerShell) and Azure CLI. The template supports C# and TypeScript.
After installing all the tools, open PowerShell Core as administrator and install Bot Dispatch:
npm install -g @microsoft/botframework-cli botdispatch luis-apis
I didn’t have to install anything else, but according to the instructions provided in the documentation, you might need to install the Dispatch and BotSkills CLI with following commands:
npm install -g botdispatch @microsoft/botframework-cli
npm install -g botskills@latest
If you don’t have Bot Framework Emulator installed, you can install it now or when you’re ready to test your virtual assistant.
It looks like you need to remember a lot of steps, but the best part here is that you have to do it only once.
After everything is ready, you need to open your Visual Studio and create a new project of type “Virtual Assistant Template.” Build your project to restore NuGet packages. The out of the box project contains a lot of very useful functionality, including QnA Maker Chitchat and FAQ knowledge bases and LUIS General model (several languages are available) with Dispatcher, language generation templates and services. It provides a solid structure that you can build on top of. The template has everything to start testing the skill locally using Bot Framework Emulator and deploy to Azure to test it in the cloud. The solution created from the template contains a test project with 15 unit tests that you can run inside Visual Studio. I’m really impressed by how many things are available by default.
Your new project contains automated scripts for deployment. You only need your Azure subscription. In the PowerShell Core console, go to your project directory. If you haven’t logged in to Azure through PowerShell, then run following command:
az login
You’ll be able to login using a web browser. When you do that PowerShell will be connected to your subscription and you can run the deploy script with the following command:
./Deployment/Scripts/deploy.ps1
The initial deployment takes quite some time, but you’re getting all the required resources in one place – one resource group, which was created by the script. The group contains 13 resources: CosmosDB, Web App Bot, Search service, LUIS and QnA, etc. See the picture below (your names and locations will be different):
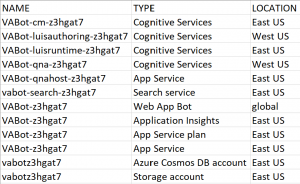
Virtual Assistant Azure resources
As you probably guessed, it’s not a cheap endeavor to use that many resources in the cloud. I spent close to $40 for three days without heavy usage (actually with almost no usage). Cognitive search looks like the most expensive resource in the group. It might look expensive, but it depends on your client needs and budget. Don’t forget you’re using high-availability resources, and you don’t need to worry about setting up logging and monitoring tools, maintaining the database and other resources. There’re always pros and
cons, so you need to weight them for each project individually.
After you deployed your code to Azure you have a bot, which you can test on Azure (“Test in WebChat” option inside the Web App Bot resource) or locally with the help of the Bot Framework Emulator. Your bot is not a Virtual Assistant skill yet. To make it a skill, you need to connect it to Virtual Assistant channels: Cortana, Direct Line and Alexa. Yes, you read it right: Web App Bot now supports the Alexa channel. It’s great news!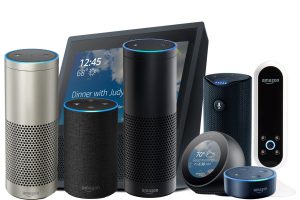
Alexa Enabled Devices
All channel connections can be made right from the Web App Bot resource: “Channels” tab. Let’s talk about the Alexa channel. You can start with selecting “Alexa” channel and then you’ll see a form, where you’ll need to add a skill id (keep this page open). Here you can find the instruction: https://docs.microsoft.com/en-us/azure/bot-service/bot-service-channel-connect-alexa?view=azure-bot-service-4.0.
When everything is successfully connected, you can start testing your new Skill right in the Alexa Developer console. Go to the “Test” tab, enable the test option for your skill (in the dropdown), invoke your bot either by typing its invocation name or by saying it. Now your bot is an Alexa skill and can be published to the skills portal to be accessible for everyone or specific organization.
This blog post turned out to be very long, but I just couldn’t contain my excitement about the new Virtual Assistant template and how it makes developers’ life easier. As always, feel free to ask questions, propose new topics for me to write about, and provide your feedback