In this blog post, I’ll be talking about my latest experience with Xamarin.Forms: layouts, navigation, barcode scanner API integration, Xamarin.Essentials (for more info about it, please, try to attend my Xamarin.Essentials talk https://veronika.dev/speaking/index.html).
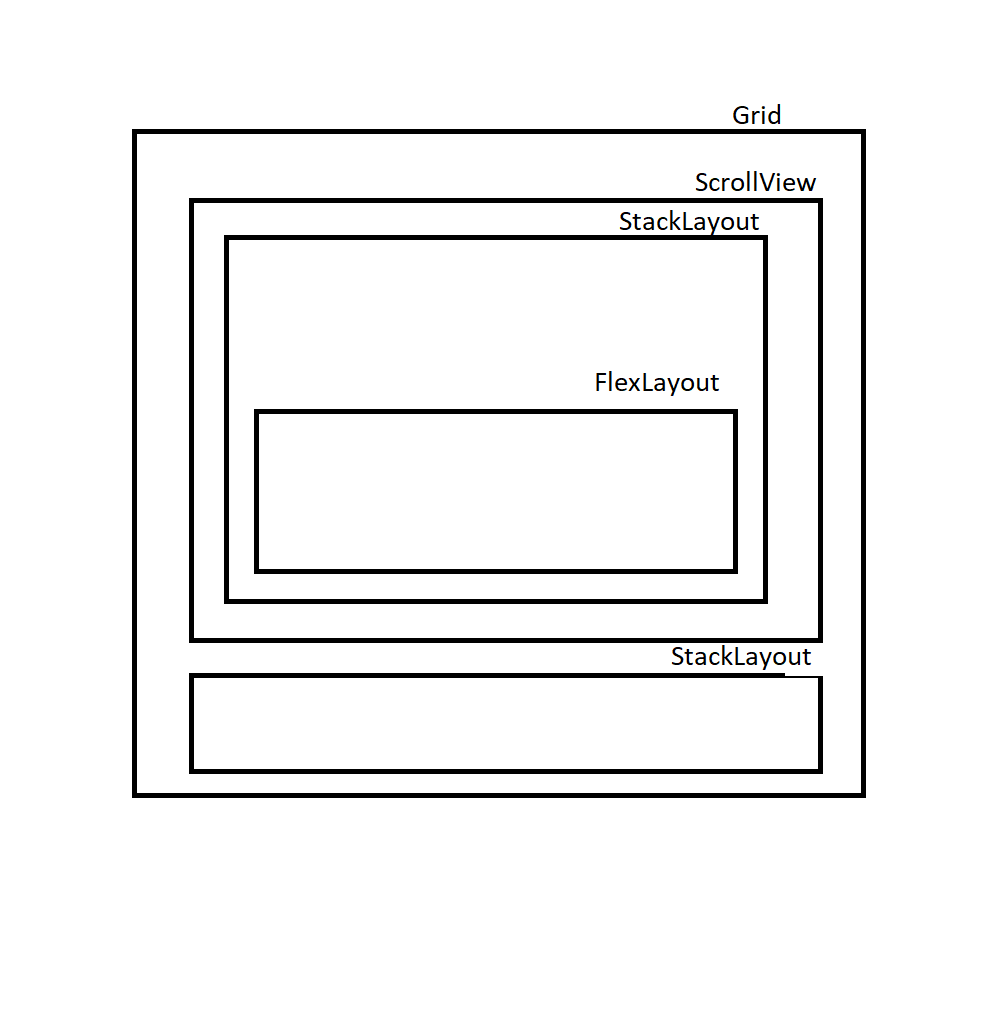
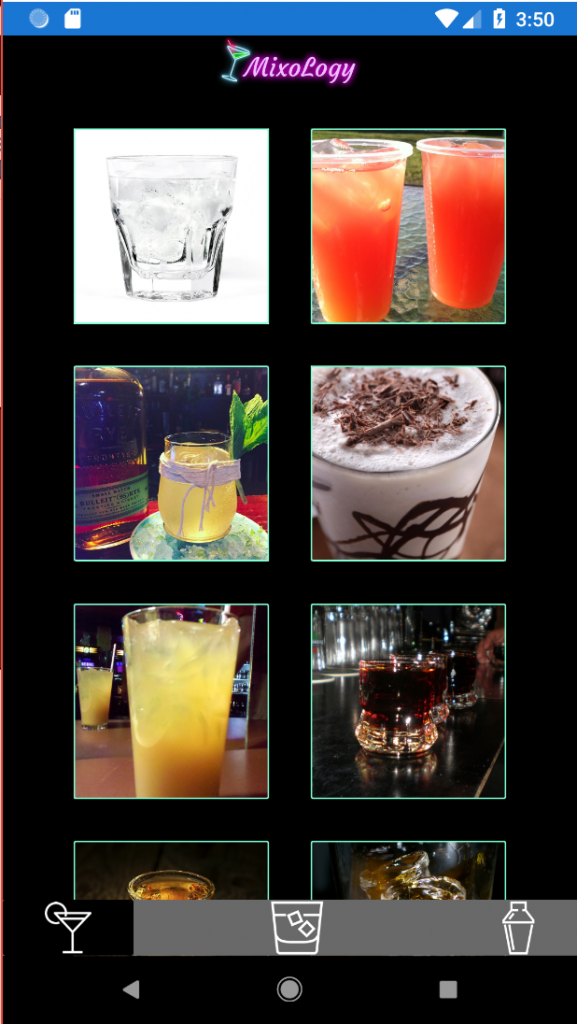
This story started at Boston Code Camp 31 (https://www.bostoncodecamp.com) where I had an opportunity both to give a talk and to learn from great speakers. Moreover, I had an opportunity to meet Vue Vixens Goddess Jen Looper (https://twitter.com/jenlooper). Side note: congrats to her for joining Microsoft just a couple of weeks ago! During her session she was talking about an app she created using Vue.js and TensorFlow, it’s called MixoLogy. I was very impressed by it and I liked the idea a lot, so I asked Jen if I can use her idea to create the same app with Xamarin.Forms and she was kind enough to allow that. Just before I started working on my app I was reading about layouts in Xamarin, including David Ortunau’s blog post about FlexLayout (https://devblogs.microsoft.com/xamarin/adaptive-mobile-designs-with-flexlayout/). He has a great idea to offer developers different challenges with brand new features, so the Xamarin team can get feedback and you and me can learn more about the new layout and get their Xamarin goodies. Unfortunately I didn’t participate in the challenge, but I wanted to try the layouts(FlexLayout mostly) and Visuals. I was impressed with how easy you can make your app’s screen adaptable for different devices: you can organize content in a row or column, align it and add auto wrap. Lots of great options to play with there. It was challenging for me to organize content items (they were images) the exact way I wanted them to be: centered 2 columns layout when a phone is in a vertical position and then I also wanted to have a logo above the columns and a button for loading more right below. So, something like that:
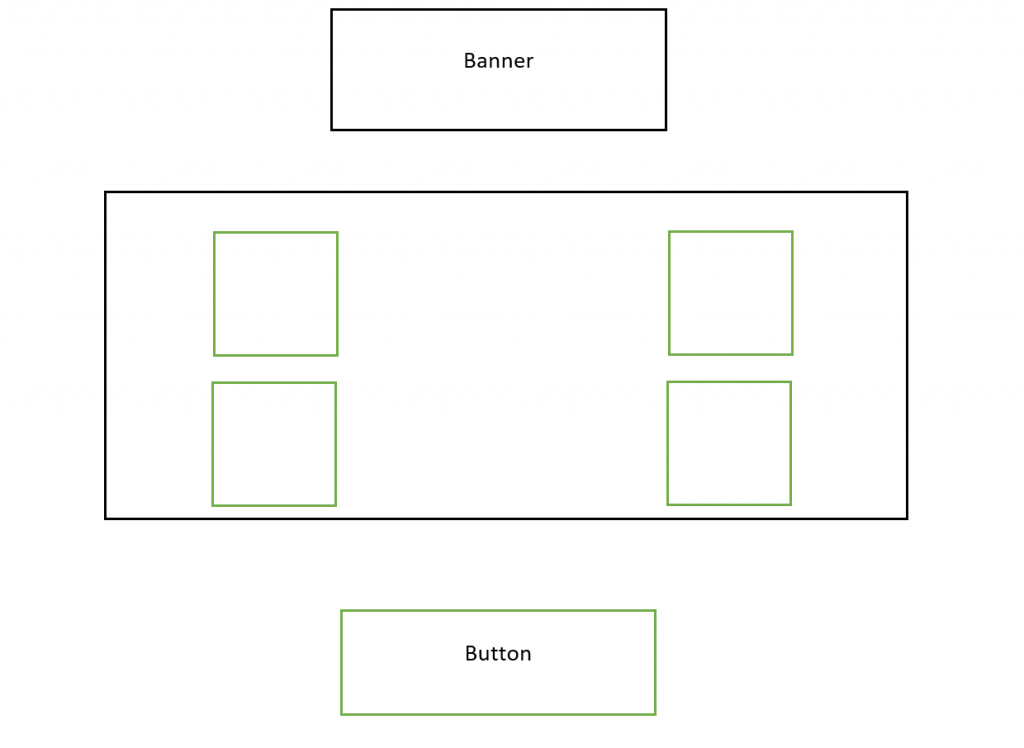
My mistake was: I tried to add everything to the same layout. So, when I realized it wasn’t working the way I wanted I figured out I needed to separate the logo, images, and button. I wrapped my FlexLayout in StackLayout and moved the logo image above the FlexLayout and the “Load More” button below it. Images became ImageButtons and I specified horizontal and vertical options for them: LayoutOptions.CenterAndExpand. I feel like my web development background helped me a lot here and I definitely like it.
If you check my code on GitHub (I’ll provide a link in the end) you’ll see I decided to display recipes as “2 steps” alerts. I don’t think it was a good idea because it’s hard to go back and forth between ingredients list and the actual recipe. I think I’ll just add a new screen or pass a recipe id to RandomRecipe screen. I think I was a little lazy there. If you’re building an actual app and want to pass parameters between screens definitely use MVVM approach (link to MVVM).
So, since I mentioned RandomRecipe screen, let’s talk a little more about it. This screen shows random recipes and the displayed recipe can be changed by shaking your phone (cool, right?). For the phone shake detection, I used Accelerometer from Xamarin.Essentials library. Shake detection is Based on raw readings from the accelerometer to calculate acceleration. It uses a simple queue mechanism to detect if 3/4ths of the recent accelerometer events occurred in the last half second. Acceleration is calculated by adding the square of the X, Y, and Z readings from the accelerometer and comparing it to a specific threshold. I’m a big fan of Xamarin.Essentials: you can have access to lots of native functionality without the need of doing it separately for each environment. You can use all APIs from Xamarin.Essentials in your app or just 1 or 2. They are based on the linking technology, so when you publish your Xamarin.Forms app to App Store and Google Play all unused APIs from the library will be unlinked and they won’t add any redundant weight to your app.
The third screen of the app is supposed to show recipes based on the alcohol you have. Jen used ML capabilities in her app and trained a TensorFlow model to recognize alcohol by talking a picture of a bottle. Unfortunately, I don’t travel as much, I didn’t have that much “training material”. I was recommended to use a barcode scanner. I was hesitant at first because the whole point of the app was to use ML, but then I realized I could practice my ML skills with different apps where I actually really need to have ML. I used BarcodeLookup API here. It’s really easy to implement and they have a giant database of barcodes. Big downside: the price. You can use the trial for a little bit, but after that it gets pricey. If you know of any free alternatives, please, let me know. BarcodeLookup API gets a barcode string and then returns information about the product. I parsed the product name field and got alcohol type from there. But in order to pass the barcode string, you need to get it. Your user needs to take a picture of the barcode so you can work with it in the backend. For taking a picture of barcode I used ZXing library (https://github.com/zxing/zxing). It’s a cross-platform library for taking pictures of barcode and parsing them. It’s very easy to use. I wish Xamarin.Essentials library had an API for taking pictures (I think Xam.Plugin.Media can be a good candidate to be added to Essentials, but it definitely has its pros and cons). It was fun to work on this app and I definitely learned a lot.
I continue working on the app. Now with new Xamarin Visuals and other features of Xamarin.Forms 4.0 lots of things in my app can be improved:
- Add Shell for the bottom navigation
- Replace the recipe pop-up with a page
- Add MVVM to pass parameters between pages
- Replace Barcode API with a custom tool (with actual ML, so the pun in the name won’t be wasted)
- Code cleaning (always needed)
Feel free to check my code here (https://github.com/Veroni4ka/MixoLogy) and as always I’m happy to receive your feedback and answer question through Twitter DMs, email and in-person chat.